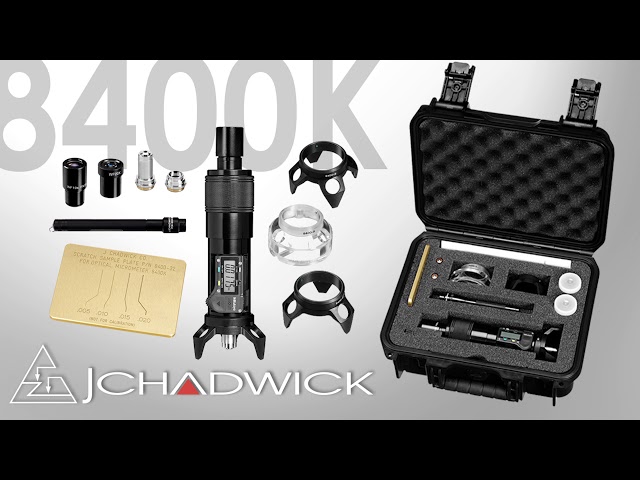
8400K Digital Optical Micrometer
Article No. 15458
8400K Certified Dig Optical Micrometer
- Optical Micrometer
- Certified Model
Features
- The "working distance" refers to how far the objective lens is from a surface when in focus. The working distance for the 10X lens is .250", for 4x lens, 1.275" above surface. (This means that .250" and 1.275" are the maximum scratch depths that could be observed, in theory, without the lens "bumping into" the surface). The 4X objective provides the most clearance, and is thus used for larger features and for transparencies, where the near and far sides can be focused upon without lens interference.
- The 4X objective lens is ideal for transparencies. The wide field of view allows observation of more and larger features, and the long working distance prevents the lens from contacting surface - even when focusing on the far side of a thick transparency (up to 1.9"). Accuracy is not compromised by using the 4X objective.
- Designed for use in the field. The sealed, non-magnetic case is dustproof and shock resistant to withstand everyday shop use. The hardwood instrument case also contains adapters and lenses for use on convex, concave, or any combination of these surfaces.
- Damage can be measured optically in a fraction of the time needed for other methods such as "blend-out." Spending time on a part that may need replacement is costly, and in many cases, the 8400K can be used to inspect parts while on an aircraft, whereas removal is often necessary using other methods.
- In addition to the clear LCD readout "floating zero" and other features, the 8400K's digital display also has an RS232 serial port for data export to the optional processor/printer.
- Packaged in a sealed, non-magnetic, shock resistant case
- Comes with ISO Calibration Certificate
- It also includes 3 interchangeable bases, 2 black and 1 clear
- A 3-Leg tripod base used for most flat and simple curved surfaces.
- A 4-Leg base used on broad convex and concave surfaces.
- A new and improved acrylic V-block base for leading edges, small diameters, outside angles, and flat surfaces next to an edge.
Technical Attributes
-
- Data
-
8400K Kit in case: 16" x 7" x 5", 5lbs Micrometer only: 9"H x 3" Diameter Base, 1.5 lbs (diameter of field of view): 10X objective (with 20X / 10X eyepieces): .040" / .070" wide
4X objective (with 20X / 10X eyepieces): .110" / .175" wideWidth Measurement - 10X Reticule Eyepiece: Use 10X reticule eyepiece with the 10X objective lens only. Scale range of eyepiece is .040 inches with .002" accuracy and .001" resolution (also 1.00mm, with .02mm accuracy and .01mm resolution). Approximate Magnification power: 40X & 80X (with 4X objective) 100X, 200X (with 10X objective)
Procedure
Procedure
- First, focus on a smooth surface next to a scratch.
- Then, zero out the digital display (you can choose a readout in either inches or millimeters).
- Next, focus on the bottom of the scratch. The digital display shows depth relative to the surface.
- Calibration is recommended once a year. Equipment needed - Gage blocks, calibrated and traceable to NIST. Sizes: 0.0625, 0.1000", 0.1250", 0.2000"
Calibration Procedure
- Wring 0.1000" and 0.0625" gage blocks together by sliding one block lengthwise across the top of another creating a step with the 0.1000" gage block on the bottom.
- Place micrometer over the step created by the two blocks (c). Position so approximately one-half of the field of view is on the upper block.
- Zero "0.0000" digital display
- Focus on lower back.
- Read display; if equipment is functioning properly the display will show thickness of upper block.
- Repeat steps 1-5, using the 0.1250" and 0.2000" as the upper block.
Delivery Content
Optical Micrometer with Digital display, 3 Interchangeable bases, 2 eyepieces & 2 objective lenses, Flashlight w/ spare batteries, Sealed foam-lined case, Scratch sample plate (for demonstration & training, not for calibration), and ISO Calibration Certificate
Downloads
Accessories
14377
Dp-1Va Printer With D2 Output, 120V
$612.00
12181
Cable 80" (2M) For Absolute Encoder Type
$81.00
Other Variations


